How to Fix Photoshop Scratch Disk Full (once and for all)

This warning has popped up a few times recently when I’ve been using Photoshop, and if you’ve seen it too, you might be wondering what a scratch disk actually is… and what you’re supposed to clear.

So, to accompany the video, I thought I’d put the steps here so you’ve got something to refer back to. There’s also a way to change your scratch disk if Photoshop won’t even open.

First, check which drive Photoshop is using

Before doing anything else, save your work if Photoshop will let you.

Then head to:

  • Mac: Photoshop > Settings > Scratch Disks

  • Windows: Edit > Preferences > Scratch Disks

Look at which drive is selected and how much space is available. That’s the drive we need to check.

You might have another drive connected with loads of room, but unless Photoshop is configured to use it, that space isn’t helping.

What exactly is a scratch disk?

Think of it as extra working room.

Imagine working on a print at a table. The print itself might be quite small, but you still need space around it for everything you’re using.

Photoshop needs that working room too. It uses space on a drive to store temporary information whilst you edit, so the size of your saved photograph doesn’t tell you how much space Photoshop might need to work on it.

There’s also a difference between a warning that space is getting low and an error that stops you opening Photoshop, editing or saving. A warning doesn’t necessarily mean the drive is completely full, but dismissing it doesn’t give Photoshop any more room.

Free up some space

Adobe recommends having at least 100 GB free on your primary scratch drive when troubleshooting this error. That’s guidance rather than a guarantee that every job will fit. Larger projects may need more.

Start with files you recognise: old video exports, downloads or projects you’ve already finished.

If you move them to another drive, check that the copies are there and open properly before removing the originals. And remember, putting files in the Trash or Recycle Bin doesn’t immediately free up the space. Review what’s in there before emptying it.

Once you’ve made room, save your work if you can, quit Photoshop completely and reopen it. Then try whatever you were doing when the warning appeared.

Give Photoshop another drive to use

If storage on your computer is always tight, another option is to give Photoshop a suitable drive with plenty of available space.

I use an SSD as a dedicated scratch disk.

Go back into Scratch Disks, select the drive and, if you’ve selected more than one, use the arrows to set their order. Adobe recommends putting the fastest drive first.

Click OK, then restart Photoshop.

Oh, and changing this setting doesn’t move your photographs. You’re choosing where Photoshop can put its temporary working data. If you’re using an external SSD, keep it connected whilst Photoshop is using it.

What if Photoshop won’t open?

You can’t get into Settings if Photoshop refuses to launch, but there’s a shortcut for that.

Hold these keys whilst launching Photoshop:

  • Mac: Command + Option

  • Windows: Ctrl + Alt

This lets you choose a scratch disk during startup. Select a suitable drive with space available, then continue opening Photoshop.

Don’t add the Shift key. That’s the shortcut for resetting preferences, which we’ll come to shortly.

Of course, if your only drive is full, the shortcut won’t create any extra space. You’ll need to make room outside Photoshop first.

Still getting the warning?

First, double-check that the free space you’re looking at belongs to the drive selected in Photoshop.

Then try quitting Photoshop completely and reopening it. Its temporary working data can build up during a session, and closing your photographs doesn’t necessarily release everything.

A restart can help, but it won’t solve a drive that’s consistently running out of room.

It’s also worth checking History States, under Settings / Preferences > Performance > History & Cache.

This controls how many previous editing steps Photoshop keeps available for you to return to. Keeping more can require more scratch space.

Adobe’s documented default is 50. If you’ve increased yours to several hundred, consider whether you really need that many. Reducing the number may help, but you’ll have fewer steps you can go back to.

Be careful with Purge

You might have seen advice to choose Edit > Purge > All.

This can release memory and scratch space, but understand what it does before clicking it: purging clears temporary editing information, including your history.

It doesn’t return your photograph to its original appearance, but you lose the ability to go back through the history you’ve cleared. You can’t undo the purge.

Save your work first if possible, and treat this as an optional troubleshooting step.

Resetting preferences

If you’ve checked the correct drive, made room and restarted, but the error keeps returning, resetting Photoshop’s preferences is another troubleshooting option.

This can help if damaged preference files are contributing to the problem. It doesn’t create storage, and it can remove your custom settings, so back those up first.

With Photoshop open, go to Settings / Preferences > General > Reset Preferences on Quit. Confirm, quit and reopen Photoshop, then check your scratch disk selection again.

If Photoshop won’t open, hold these keys whilst launching:

  • Mac: Command + Option + Shift

  • Windows: Ctrl + Alt + Shift

That’s the shortcut with the extra Shift key. You’ll be asked whether you want to delete the Photoshop settings file.

Start with the Scratch Disks panel

The main thing is to check which drive Photoshop is actually using and how much room it has. Then free up space or give it another suitable drive to work with.

Make one change at a time and repeat whatever caused the warning. That way, you’ll know what helped.

The video above takes you through where to find everything.

Right, I hope that’s useful.

Glyn
Has Apple Made Us Question Every “Real” Photo?

When Apple announced the new iPhone 18 Pro and Pro Max, they also introduced something that, as a photographer, I'm definitely interested in. It's called Apple Reference Image, and the idea is to give us stronger evidence about where a photograph came from, as in whether it's real or not.

I can see some real benefits to that, particularly when somebody looks at a photograph and immediately dismisses it as AI, but there's one detail that raises a few questions; it's optional. You have to choose to use it.

So what happens when somebody doesn't? Have they got something to hide, did they forget to switch it on, or were they simply using a camera that doesn't offer it? That's the part I think we need to talk about alongside the technology itself, because how we interpret this could be just as important as what it does.

What Apple has actually announced

Apple says the iPhone 18 Pro's main camera captures signed sensor data in reference mode, and its Private Cloud Compute system then develops that into an unaltered reference image. You can view that reference alongside the main photograph in Photos and compare the two, and Apple has also announced support for developers to enable reference viewing in other apps.

There are launch restrictions too. Reference capture won't initially be available in the EU, and it won't be available at all in China.

The useful idea here is having something to go back to when you want to examine a finished picture, but a comparison isn't necessarily a complete record of every editing step. I wouldn't assume we'll get a list telling us which tool was used, in which application and in what order.

Where it could help

Imagine you've made a photograph of something unusual. Perhaps the light was extraordinary, or you happened to catch a moment that looks almost too good to be true. You share it and somebody says straight away that it's AI, and at that point "no it isn't, I was there" might not get you very far.

A trustworthy reference could give you something more useful to put in front of them, but it won't make everybody believe you. Some people have already made their minds up, whatever evidence you show them; for somebody who actually wants to examine the picture, though, additional evidence could help.

I can also see a potential benefit for picture editors and clients. If the question is whether something significant has been added or removed, being able to compare the finished picture with a trusted reference could make that conversation a lot clearer.

Editing isn't the same as dishonesty

This is the part that interests me most, because I spend a lot of my time teaching Photoshop and Lightroom. Editing a photograph doesn't, by itself, tell you whether somebody is being dishonest.

Take a portrait. I might adjust the white balance, lift the shadows, remove a temporary blemish, or go quite a bit further than that. Those are changes, of course they are, but what matters is what the photograph is for and what the changes actually do and what I'm telling you about it.

If I remove a person from a news photograph, that could change your understanding of what happened entirely. If I make a composite and tell you it's a composite, you're being given the information you need to understand the work. That distinction matters.

So I'd like to see tools like this encourage more useful conversations about editing. What changed, did it alter the meaning, and was the picture presented honestly? Those questions tell us far more than simply asking whether Photoshop was involved.

The trouble with voluntary

My first concern is that the people who want to show how their pictures were made have a reason to take part, whilst somebody who wants to conceal what they've done can simply choose not to. That doesn't make the feature pointless, but it does limit what we can conclude from it. We could end up with some pictures that have supporting evidence and many more where we still don't know, and the danger is how quickly "we don't know" turns into "it must be fake".

Imagine somebody captures a really important moment but hasn't enabled the feature. Perhaps they didn't know it existed, or didn't expect to photograph anything important that day; they saw something happening, picked up their phone and took a picture, which is hardly unusual behaviour. Should we trust their photograph less because they didn't think about authentication beforehand? I'd be very uncomfortable with that.

Then there are people using older phones, different cameras or equipment that simply doesn't support this system. Their photographs don't become less honest because somebody else bought a newer phone, and I wouldn't want us drifting towards a situation where you're expected to own certain kit just to have your work taken seriously.

The obvious response is to have it switched on for everybody, and that's a fair point, but I also understand wanting a choice. People use their cameras for all sorts of things, family pictures and visual notes and creative experiments and work in progress, and they may not want an extra reference workflow attached to everything they shoot.

Before deciding whether it ought to be on by default, I'd want to understand the practical experience. What happens when you've got no connection, how much extra storage is involved, and how long does the process take? Those are questions worth testing, and I'm not suggesting they're established problems. If something is easy to use and clearly useful, people have a reason to adopt it; if it adds confusion or friction, a lot of people won't bother.

What happens after you press the shutter

There's also the journey a photograph takes after it's been made. You might edit it, export it, send it in a message, upload it somewhere, or have somebody else download it and pass it on. What happens to the supporting evidence along the way? Can the person at the end find it, can they view it with the software they already have, and will they understand what they're looking at?

A feature can work perfectly for the photographer and still be of limited value to the viewer if the evidence is hard to get at. That's something I'd want to test properly, taking a photograph through a normal editing and sharing workflow and then seeing what the recipient can actually check.

I'd also want to see how clearly the interface separates missing evidence, a failed check and a successful check, because those are completely different situations. If they all get read as a simple real or fake verdict, we're going to create a lot of confusion.

A true photograph can still mislead

There's one final limitation that no amount of enthusiasm about authentication should make us forget; a camera can faithfully photograph a misleading situation. I can stage a scene, choose a viewpoint that leaves out something important, or put an inaccurate caption underneath.

Imagine I photograph a small group of people waiting outside a building. One caption says they're waiting for it to open, another says they're protesting against its closure. Same picture, completely different stories, and checking where the image came from doesn't by itself tell you which caption is accurate.

That's a recognised limitation of photo provenance more broadly; evidence about an image's history can't, on its own, establish whether the content is factual. We still need context, which means asking who published the picture, what they're claiming, and what other evidence supports it.

Where that leaves me

I'm definitely interested, and I can't wait to see how it works in practice. Giving photographers a stronger way to support their pictures could be really valuable, and so could making it easier to examine meaningful changes, but I think we need to be careful about what we conclude.

If a reference image is available, use it as evidence and understand what it does and doesn't establish. If it isn't, ask questions rather than jumping straight to an accusation.

For me, that's the biggest concern with the voluntary approach. The people who opt in may gain a useful way to support their work, whilst everybody else could find themselves under suspicion for no good reason.

Why your Prints are Too Dark (and How to Fix It)

Of everything I get asked about with printing, why do my prints come out dark is the one that comes up more than anything else, and if it's happening to you then you haven't done anything daft. You've more than likely just taken the same advice that I did before I figured this out.

Why it happens

Your screen is backlit. It's basically a light source, the same as a lamp is, and a print isn't. All a print can do is bounce back whatever light is already in the room, so you've got one thing making light and one thing borrowing it, and those two are never going to look exactly the same.

However, here's the bit that catches everybody out. If your screen is throwing out more light than a sheet of paper could ever hand back to you, something happens while you're editing that you won't notice at the time. The picture looks bright because everything on the screen looks bright, so you bring it down a little, and what you've actually done is make that adjustment based on the screen rather than the picture. Then you send it to the printer and the paper has got no way of lifting it back up again, so you get the version you darkened on a surface that can't do anything about it.

The number

What you'll normally hear is to set the brightness in your calibration software to somewhere between 80 and 120 candela, and more often than not you'll hear 120. Sure, 120 looks great. It's bright and everything on it has a bit of life to it, but that is exactly what's wrong with it. It looks great because it's throwing out far more light than a sheet of paper is ever going to give back to you, and all the time it's sat there looking great you're quietly pulling down pictures that were never too bright to begin with.

I'm not saying everybody else has got it wrong. I'm saying I took that recommendation and my prints were always too dark.

The histogram is the only thing telling the truth

When your screen is calibrated too bright it's kind of lying to you, and the histogram is the only thing you can really trust. Change your screen brightness and to your eye the picture completely changes, but the histogram doesn't move, not one bit, because nothing has changed in the actual file. It's the one thing in this whole process that doesn't care how bright your monitor is.

The settings I use

After a lot of trial and error, and I do mean a lot, along with a fair bit of wasted paper, ink and money, I settled at 60 candela for my screen in my workspace, and I've not had a print come out too dark since. The software you calibrate with may well look different to mine, but the numbers transfer straight across:

  • luminance 60 cd/m2

  • white point D65

  • gamut Adobe RGB

  • gamma 2.2

  • black point 0.5 cd/m2

Most calibration software will offer you presets, and the photography one will typically drop the luminance in at 120, which is the whole problem, so I ignore the presets and put the numbers into the custom target instead. The black point is worth a word too. By default it'll be sat at absolute zero, and I lift mine just a touch to 0.5, because even in the darkest parts of a picture I still want a bit of detail; at absolute zero it's just completely black.

I'm not saying 60 is the right number for everybody either, because the room you're working in comes into it.

The room your screen is sat in

Your eyes don't judge a screen on its own, they judge it against everything else around it, so a bright screen in a dark room appears brighter than it actually is, you darken more, and it's the same problem again only now the room is making it worse.

Two things matter. Enough light in the room, and light that's fairly neutral rather than a warm domestic bulb, because a warm bulb will have you making decisions about colour and that's a whole different problem. In my office the main light stays off and I use a Screen Bar Halo 2 from BenQ instead, which throws light down onto the desk without any of it hitting the screen and puts a glow on the wall behind the monitor. That glow on the wall is the bit that does the work, because it cuts out the extreme contrast of sitting in a dark room with just a screen on.

If you haven't got a calibrator

You can still get most of the way there for nothing. Take a print you've already made, hold it up next to your screen, and bring the screen's brightness down until the two of them look pretty much the same. That's it. It won't fix your colour and it isn't calibration, but it's a down and dirty way to stop your prints coming out too dark.

Whichever way you go at it, going from 100 down to 60 or thereabouts will look far too dark at first, and it is quite a jump, but just let your eyes adjust and they will after a few minutes, and very quickly it'll seem normal.

Your Next Camera just got MORE EXPENSIVE

If you've been saving up for a new camera here in the UK, it's worth going back and checking the price you've got in your head, because it might not be the price any more. Three Fujifilm bodies cost noticeably more today than they did a couple of weeks ago, and nobody said a word about it.

What actually went up

I'd heard a rumour that price rises were coming in on the 1st September, so on the 31st August I wrote down the prices of 13 camera bodies across Wex and the manufacturers' own stores, then went back a few days later to see what had changed.

Comparing one shop against another never tells you anything useful, because there's always a promotion running somewhere, or a different margin sitting behind the counter. The only thing that means anything is the same camera at the same shop on two different days.

At Wex the changes were clear:

  • Fujifilm X100VI, £1,599 to £1,749

  • Fujifilm X-T50, £1,299 to £1,399

  • Fujifilm GFX 100 II, £6,999 to £7,499

That's £150 on the X100VI, which is a shade over 9%, £100 on the X-T50, and £500 on the GFX.

This isn't a case of a retailer quietly moving their margins about either, because Fujifilm's own UK web store shows exactly the same prices, and when a manufacturer changes the price on their own shop, that's the new baseline.

Two bodies that turned up on a leaked European retail list earlier in the summer, the X-S20 and the X-E4/X-E5 line, have stayed where they were for now.

Why it's happening

The interesting bit is that Fujifilm did explain all of this, just not to us. They explained it to their investors.

In their August quarterly financial presentation they set out a big jump in production costs tied directly to memory chips, which is the DRAM and flash memory that sits inside a digital camera. Demand from AI data centres has pushed the price of those components up, and cameras are competing for the same parts.

Fujifilm had originally forecast that memory costs would hit their imaging division by around 6 billion yen this year, but in that August report they more than doubled that to 14 billion yen, naming digital cameras and instant photo systems specifically. Their stated plan for handling it is "pricing measures and the procurement of alternative materials", which in plain English means passing some of the bill along to us.

Loud in Japan, silent over here

What makes it frustrating is that none of this is being said out loud in this country, because in Japan the manufacturers have been completely open about it all year.

Canon published formal notices about price adjustments across dozens of products back in May, Nikon issued official notices covering bodies like the Z50 II, and Sony posted updates for their cinema line in August. Over here we just woke up to bigger numbers on the product pages.

If you shoot Canon, Sony or Nikon and you reckon you're in the clear because UK prices haven't moved yet, I wouldn't get too comfortable. Shops tend to sell the stock they've already got at the price they paid for it, so once the warehouse clears and the next batch lands at the new wholesale cost, the shelf price usually follows.

OM System are doing the complete opposite at the minute, running their own discounts on their site through to late September on bodies like the OM-1 Mark II and the OM-5.

What I'd check before buying

However, there's a simple way to work out where you actually stand, and it takes a couple of minutes.

Start on the manufacturer's own store, because that gives you the true current RRP and it'll tell you straight away whether a quiet rise has already gone through. Then go and look at the independents you normally buy from, because if they're still sitting on earlier stock they may well still be selling at the old price, and that difference stays in your pocket. Depending on the body, that could be anywhere from £100 to £500.

None of this is a reason to rush out and buy something you weren't going to buy anyway, but if a camera has been on your list for a while, it's worth knowing that the number you wrote down a month ago might not be the number you pay. If you've spotted a quiet rise, or a sudden discount, on something you've been saving for, do say so in the comments; it all helps everyone work out where things are really heading.

Your Mac is Changing your Prints

You set the file up, soft proof it in Photoshop, load your favourite paper, hit print, and what comes out looks nothing like what you were looking at on screen. The colours are off, the skin tones have picked up a heavy magenta cast, and you're stood there wondering what on earth just happened.

Same printer, same paper, same profile, two completely different results.

Nine times out of ten it isn't your editing and it isn't your paper profile. It's your Mac, quietly making a decision on your behalf without ever telling you about it.

When you plug a printer into macOS, the system will very often set it up using AirPrint rather than the manufacturer's full driver. It does it silently, there's no warning, and it takes away your control over the settings that actually matter for a fine art print.

Why AirPrint gets in the way

AirPrint is fine for knocking out a boarding pass or an email, but for printing work you care about it causes real problems.

The big one is colour management. The option to turn off the printer's own colour handling disappears, so Photoshop and macOS both end up trying to manage the colour at the same time, and they don't agree.

Then there's the media types. Instead of picking the fine art paper you've actually loaded, you're left with basic options like plain paper or photo paper, which means the printer can't set the right head height or the correct ink limits for what's going through it.

Put those two together and you get the colour shifts, and it's the skin tones where you'll notice it first.

Checking and fixing it

However, there's a good reason it happens, and there's a simple way round it. This takes about a minute, and it'll save you a fair bit of ink and paper.

Start by going to your printer manufacturer's website, Canon, Epson or whoever it might be, and download the full driver software for your model, then install it.

Next, on your Mac, head to System Settings, then Printers and Scanners, click the info icon next to your printer and have a look at the driver details. If it mentions AirPrint anywhere, remove the printer.

Then add it back properly. Click Add Printer, select your device from the list, and this is the bit people miss, look at the Use dropdown at the bottom. Don't leave it on the default AirPrint option. Choose Select Software, pick your manufacturer's driver from the list, and click Add.

That's it.

Once the full driver is in place, all your print settings come back, the custom media types are there, and the colour management options are exactly where they should be, which is the bit that makes the whole difference.

There's a full walkthrough in the video above with the side by side print comparison, so you can see the setup on screen as you go.

Focus Stacking, AI and What Counts as a Photograph

World Press Photo has tightened up the rules for its 2026 contest, and the list of what's now out is longer than you might expect. No synthetic images. No generative fill. No AI enlarging either, so Adobe Super Resolution and Topaz Photo AI are both named and both ruled out. Then there's the bit that surprised me more: phone pictures are only eligible if they were shot in standard mode, so HDR, portrait mode, creative lighting effects and panorama mode all disqualify an entry, and multiple exposures and stitched panoramas are gone as well, however they were made.

It's worth sitting with that for a minute, because a fair bit of ordinary, honest photography falls outside those lines.

The rule is about trust, not technique

To be fair to World Press Photo, none of this is really about punishing anybody for blending frames. It's a photojournalism contest, and it's trying to hold a line on one question: does this image record something that actually happened, in front of a lens, at a moment in time. Nothing added, rearranged, reversed, distorted or removed from within the frame. Colour work and cropping are fine, sensor dust can go, but anything that changes what's in the picture is out, and any influence over the scene has to be declared, so a posed portrait or a reenactment gets said out loud in the caption, as do any directions given to the person in front of the camera.

That's a sensible place to draw it for news photography, where the whole point of the image is that it's evidence. I understand exactly why they've put it there.

Worth saying as well, because it gets missed, the rules aren't anti-AI across the board. Denoise is fine. So are automatic adjustments on levels, colour and contrast, along with object selection for local adjustments, all on the condition that they don't add or remove anything the camera captured. You can use AI to pick out a sky and work on it, but you can't hand in a shot your phone quietly built out of several exposures, which tells you the line isn't really about how clever the software is, it's about whether anything got added along the way.

But hardly any of us are shooting under those rules

Here's the bit that's been nagging at me. Outside of photojournalism, computed images aren't the exception; they're the default. Plenty of landscape and seascape photographers stack focus or blend exposures as a matter of course, and most stopped thinking of it as anything unusual years ago. Every phone in every pocket is doing HDR without ever being asked. Portrait mode is now how most people on earth see a photograph of a face, and none of that is invented out of nothing, it's still light hitting a sensor, but it is an image assembled from more information than one exposure could ever hold.

So when a contest draws its line at the single frame, it's protecting something real for its own corner of the industry, but it also shows up how far the rest of us have drifted without ever really noticing we'd crossed anything.

Then there's what AI is doing to all of it

The reason World Press Photo has had to spell this out in so much detail is the same reason it matters to the rest of us. Generated images are now indistinguishable from photographs at a glance, and they're being made at a scale that's hard to picture. The Gemini app passed a billion people a month on the 11th August, and Google reckon it's turning out over 150 million images a day. That's one app.

Google also had to pull the AI image feature out of Google Earth a day after it launched, because people were immediately generating photorealistic satellite imagery that broke its own policies. One day.

Against that, a photography contest banning AI outright isn't an overreaction; it's one of the very few places drawing any line at all, at a point where a convincing photograph of a real place, taken by nobody, is a perfectly normal thing to come across.

Where I land on it

I don't think World Press Photo is wrong to ban AI images from a photojournalism contest, because that's precisely what the contest is for. However, I don't think the stricter stuff about HDR and portrait mode and stitched panoramas is really about AI at all. It's a reminder that "unmanipulated photograph" stopped being a simple category a long time before generative AI turned up, and most of us made our peace with that a good while ago without giving it much thought.

So the more honest question probably isn't whether a picture is AI or not; it's what any of us are actually claiming happened in front of the camera when we hand somebody an image and call it a photograph.

I haven't got a tidy answer to that, and I'm not sure the industry has either.

🚨 Here’s a link to the World Press Photo Competition Rules: www.worldpressphoto.org/contest/entry-rules

Who is Photoshop for now? 🤷‍♂️ (update 27.10.0)

Here's a question I've been carrying around for a while now, and I still haven't got a tidy answer for it …

Who is Photoshop for now?

For most of the years I've been using it, Photoshop has been the place I go to disappear. I'll open an image with a rough idea of where I want to take it, start working, and the next time I look up properly two hours have gone. That isn't just productivity, it's creative escapism, and I think that deep flow state is why so many of us fell in love with the application in the first place.

Lately though, opening Photoshop feels a bit different. It feels like it wants something from me. It wants me to write a text prompt, it wants me to keep an eye on my generative credit balance, and it seems remarkably keen to show me what it can do without me.

I want to be clear about where I'm coming from. I love Photoshop; it's what I do, it's what I built my career on, and I'm not going anywhere. But when you genuinely care about a tool you pay close attention to the direction it's pointing in, and looking at what's arrived in recent releases like version 27.10.0, I think it's worth having an honest conversation about where things are heading.

Two interfaces and a bit of an identity crisis

There are a few significant shifts in the interface in the newer updates.

The contextual taskbar now has a dedicated Prompt to Edit button, so instead of making a careful selection first, you can prompt changes right across an entire image using various AI models.

Then there's the AI Assisted Editor workspace, which you can enable from the menus. Switch to it and Photoshop strips away your layers, your familiar tools and your adjustments, and replaces the lot with a prompt driven layout that looks and behaves like Adobe Firefly sitting inside Photoshop.

There's also the Pro Editor label. The workspace you and I have used for decades, with its layer stacks, blend modes, masks and smart objects, is now officially labelled the Pro Editor to tell it apart from the AI Assisted mode. Photoshop never used to need a qualifier; it was just Photoshop.

I do understand the logic from Adobe's side. The full Photoshop interface is intimidating for beginners and a simplified prompt box lowers the barrier to entry, but turning the whole canvas into a prompt box disables the very foundation that makes Photoshop worth learning in the first place, which is non destructive layers, precise pixel control, and being able to unpick your creative decisions months down the line.

If someone purely wants to generate an image from text, they've already got dedicated web tools and mobile apps for that. What they don't need is desktop Photoshop with its core strengths stripped out.

Resolution and control

Beyond the workflow philosophy there are some practical hiccups when you lean on whole image generative edits.

Run a full prompt, asking the software to add weather effects say, and it generates an entirely new flattened layer. Even with the recent improvements to generation resolution, the output is often softer and lower in detail than your original camera file.

If you then try to mask through to recover the original sharpness on your subject's face, you run into problems fairly quickly. Perspective shifts, subtle facial alterations and mismatched lighting mean the generated background no longer lines up cleanly with the original capture, so you end up spending extra time fixing blend modes, manually aligning shifted anatomy and correcting colour mismatches, just to make the composite work.

The credit counter

There's another subtle shift that changes how the software feels to use, and that's the generative credit counter.

Adobe have made the right decision by being transparent and showing you exactly what a generation will cost before you press the button; hiding the cost would be far worse. But seeing that meter tick down does introduce a psychological hesitation.

You pause before generating. You wonder whether this variation is worth spending a credit on or whether you ought to save it, and if the result comes back slightly off, you've then got to decide whether a second roll of the dice is worth the cost.

In twenty years of editing I've never opened a Curves adjustment and wondered whether I could afford it. I've never dodged and burned a portrait with a bill running in the corner of the screen. Creativity thrives when you're free to experiment, fail and try again without an active meter running.

The quiet lane and the loud lane

I don't want any of this to sound like a complaint about modern features. In recent updates to Camera Raw, Adobe introduced a new Glow adjustment covering diffusion, bloom and halation. It doesn't need a prompt. It's practical, it's well engineered, and it's built directly for photographers and retouchers, which is Adobe at their absolute best.

Historically Photoshop has moved forward in two lanes at the same time. There's the loud lane, the flashy headline grabbing features that generate all the excitement, and there's the quiet lane, the foundational unglamorous refinements to core tools, performance, selections and menus that quietly save you ten minutes on every job for the next five years.

My concern isn't that generative AI exists in Photoshop. My concern is that the quiet lane slows down because all the engineering focus goes into the loud one. We need generative tools when they genuinely speed up complex retouching work, but we also need the core engine to keep advancing, and we shouldn't have to choose between modern AI assistance and the deep precise craft of manual image making.

I'd be interested to know where you've landed on it, whether the generative tools have changed the way you work, or whether you're staying firmly in the layer stack.

Reflection Removal NOT WORKING in Lightroom? Try this

The Reflection Removal tool in Lightroom and Camera Raw is a brilliant addition, but it does have its limits at the moment, and that comes down to the way it's been designed. As things stand it's built for windows that are the dominant part of the picture, so if the glass you're working on is only a small part of the frame, you can hit apply, watch the bar do its thing, and end up with an image that looks exactly the same as it did before.

Someone in my photography community got in touch about this. He had a raw file of a cabinet indoors, he'd followed all the usual steps, and the reflections just wouldn’t shift.

However, there's a good reason for that, and there's a simple way round it.

Why it ignores some reflections

Reflection Removal sits under Distraction Removal, and right now it's looking for a big window; a properly dominant one, filling a good chunk of the frame.

Put it on a glass display case, or a pair of glasses, or a window that only takes up a modest part of the scene, and the algorithm often does nothing at all. It isn't broken; it just doesn't think there's anything there worth working on.

I'd expect that to change. These tools tend to get better quickly, and smaller areas will almost certainly be handled in time. For now though, we take a slightly different route.

The Photoshop route

Worth saying first, doing it in Camera Raw or Lightroom doesn't use any generative credits, which is one of the nicer things about it, but taking the file into Photoshop and using AI will use a credit, but you do get total control over what happens, and the result is clean.

It works like this.

  1. open the image in Photoshop, which from Lightroom is a right click and Edit In > Adobe Photoshop

  2. grab the Polygonal Lasso Tool, or whichever selection tool you get on with, and draw around the glass with the reflections in it

  3. click Generative Fill on the Contextual Taskbar

  4. in the model picker, choose Firefly Image 5

  5. type in the prompt: remove the reflection from off the glass do not change the original content

  6. hit Generate

That's it.

Firefly Image 5 is the part that matters here; it's designed to edit while holding on to the detail that's already in the file, so Photoshop isn't off inventing new objects and quietly swapping your subject for something it made up.

What comes back

Because it's a detail-preserving model, you get one result rather than the usual three variations to choose between.

The reflections go, and the things that were sitting behind the glass all along, book spines, shelves, whatever happens to be in there, come through properly. It looks very much like you'd screwed a polariser onto the front of the lens and dealt with it at the time of shooting, which is the bit I really like about it.

Removing People in Lightroom When You Don't Use Photoshop

Taking a person out of the middle of a group shot isn't something I'd do this way. If it were my picture I'd be in Photoshop, on layers, doing it properly by hand, because that's what I know and that's what gives me control over every last bit of it.

But that's me, and I've spent years getting comfortable in there. Plenty of people haven't, and don't want to, and have no particular reason to. So this post isn't really for photographers who already live in Photoshop. It's for everybody else.

Who this is actually for

If you edit in Lightroom and that's where you're happy, this is for you. If you don't have Photoshop installed and can't see the point in paying for something you'd open twice a year, this is for you as well. If you've had a go at layers and masks and found the whole thing off-putting, same again.

It doesn't have to be for professional work either. Most of the time it won't be. It's the family photo where somebody's stood in the middle who you'd rather wasn't, the holiday shot that would be lovely if it were just the four of you, the picture you want to get printed and stick on the wall. That's a perfectly good reason to want this, and there's no sense in learning a whole other application for it.

Why the Remove tool struggles here

Lightroom has Generative Remove built in and for everyday bits it's brilliant. A bin in the background, a stray sign, someone wandering through the far side of the frame, it deals with all of that without any fuss.

Ask it to take a whole person out of the middle of a group, though, and it tends to come unstuck. You get warped detail where the arms and hands were, limbs that seem to belong to nobody, and a strange empty space where the person was stood. Everybody else stays exactly where they were, which is really the giveaway. The gap is the problem, not the person.

Sending it over to Firefly

What you can do instead, without leaving your catalogue, is push the photo across to Adobe Firefly and let it rebuild that part of the frame.

It works like this.

  • go to the Photo menu in Lightroom

  • choose Generate in Firefly, then Edit photo

  • pick your model in the panel at the bottom

  • set the output quality to High

  • write your prompt

  • hit Generate

I tried a few models and GPT Image 2 gave me the most natural result of the lot. Worth trying a couple yourself, because they behave differently on the same picture.

The prompt is doing most of the work

This is the part that decides whether it works, so it's worth slowing down over.

A vague prompt gets you a vague result. Tell it to remove the person and that's all it'll do, which puts you straight back where you started with a hole in the middle of the photo. What you want is to describe the finished picture, not the job.

So ask for three things. Remove the person. Close the space between the people either side of them. Keep the original faces, clothing and background as they are. That last one is the bit most people leave out, and it's why results come back with faces that look subtly wrong and nobody quite able to say what's changed.

Say all three plainly, in a sentence or two, then generate.

Getting the resolution back

Firefly gives you a clean result, but a smaller one than you sent it. The original here was over 6000 pixels wide straight out of the camera, so there's one more step before you're done.

On the left hand toolbar there's an Upscale option. Take it up by 4x and you're back over 6000 pixels wide, which matches the original file. Hit Download, bring it back into your catalogue, and carry on editing it like any other frame.

That's it. No layers, no masks, no learning a second application.

What you're trading

I'd be doing this differently, and it's worth being honest about what that means. Doing it by hand in Photoshop gives you control over every pixel, and if the picture really matters, that control is the reason to learn it. Handing it to Firefly means accepting whatever it decides to give you, and sometimes that'll be a couple of goes before you get something you're happy with.

For a lot of pictures, though, that's a fine trade. You get the photo you wanted, in the software you already use, in about two minutes.

Have a watch of the video above if you'd rather see it happen than read about it. It goes quicker than it sounds.

The Westcott Photography Wagon

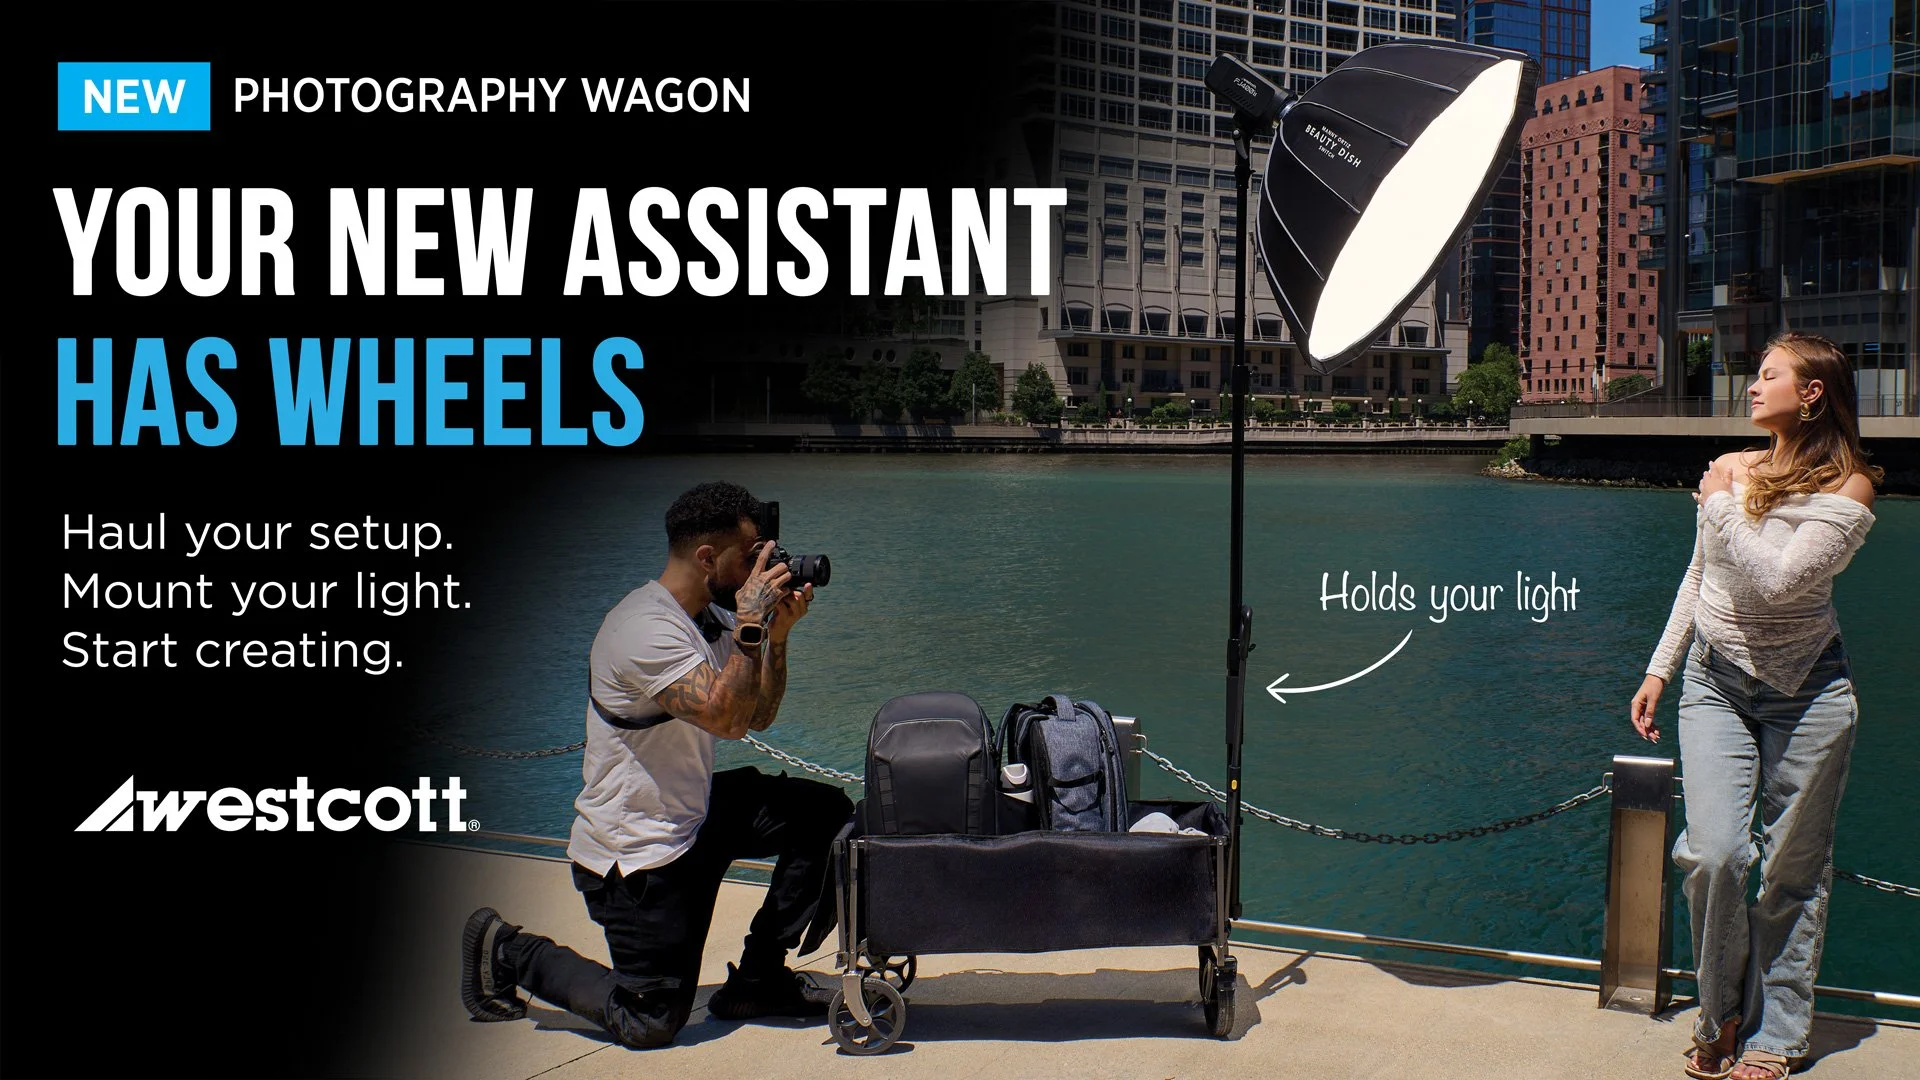
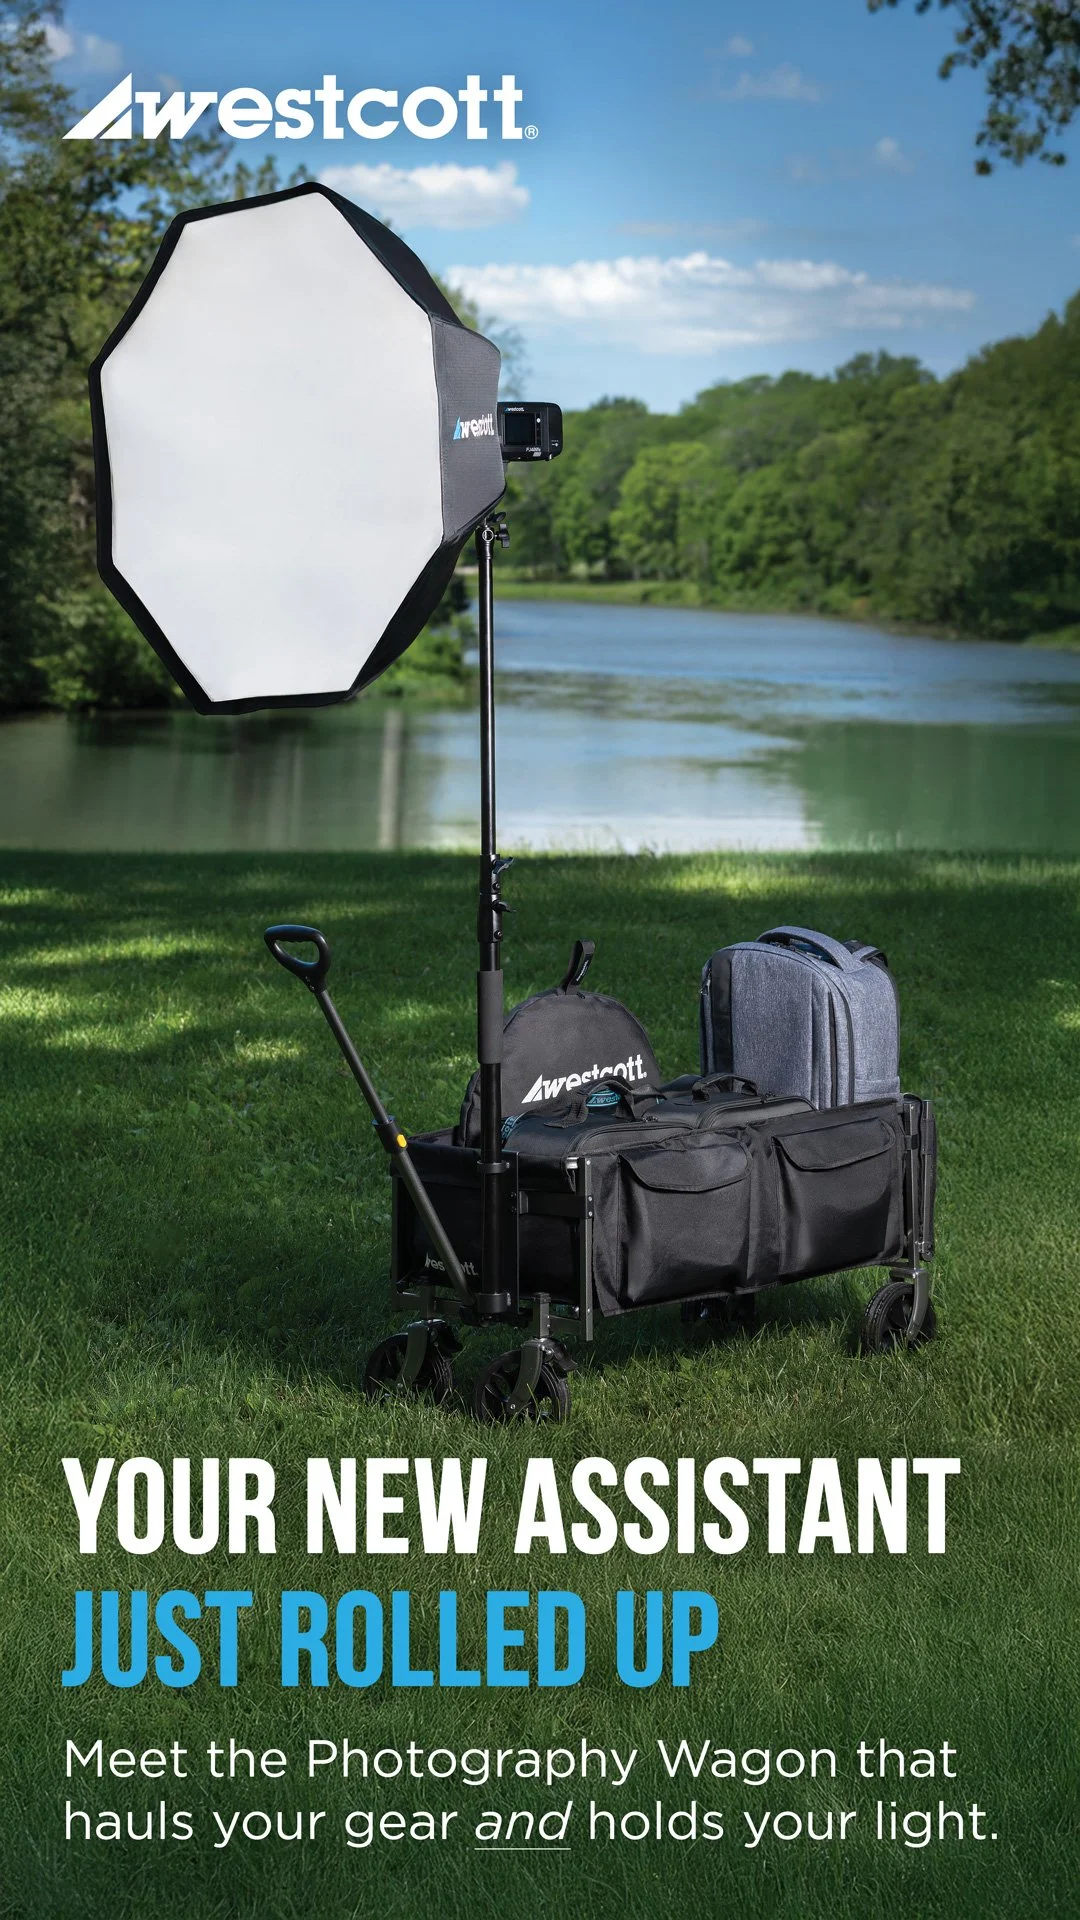
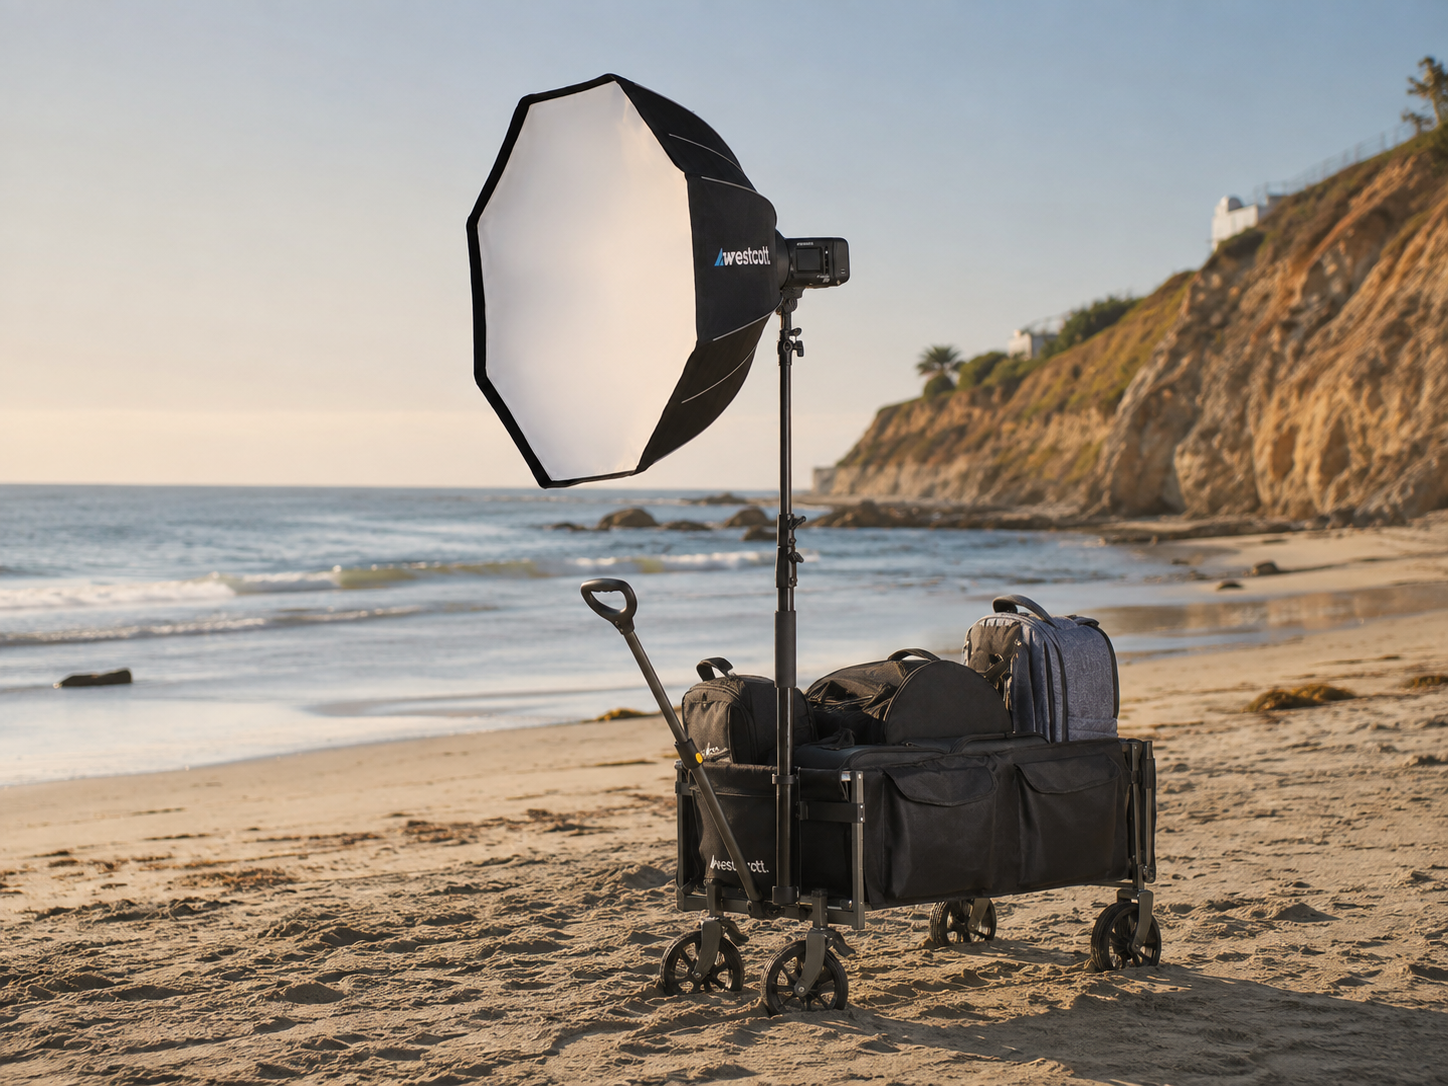
Today, Westcott have announced the Photography Wagon!

It's a collapsible rolling gear cart AND light stand built specifically for photographers and filmmakers, it's available from today, and it's priced at $189.90 in the US and £159 + VAT in the UK

The walk from the car

Every “on location” photographer can relate to this; light stand under one arm, camera bag on your back, softbox in the other hand, and a backdrop that won't sit comfortably under anything. Then you get to where you're setting up and realise the batteries are still in the boot.

So you go back, and more often than not you go back again.

That's the problem this thing exists to solve, and I like that Westcott have gone after it rather than after another light. At the Wex roadshows this summer I've been carrying the X-Drop Pro, my vintage grey backdrop, an FJ250, the 36 inch Octa and a stand, and none of that is heavy on its own … it's just awkward.

The boom pole is the point

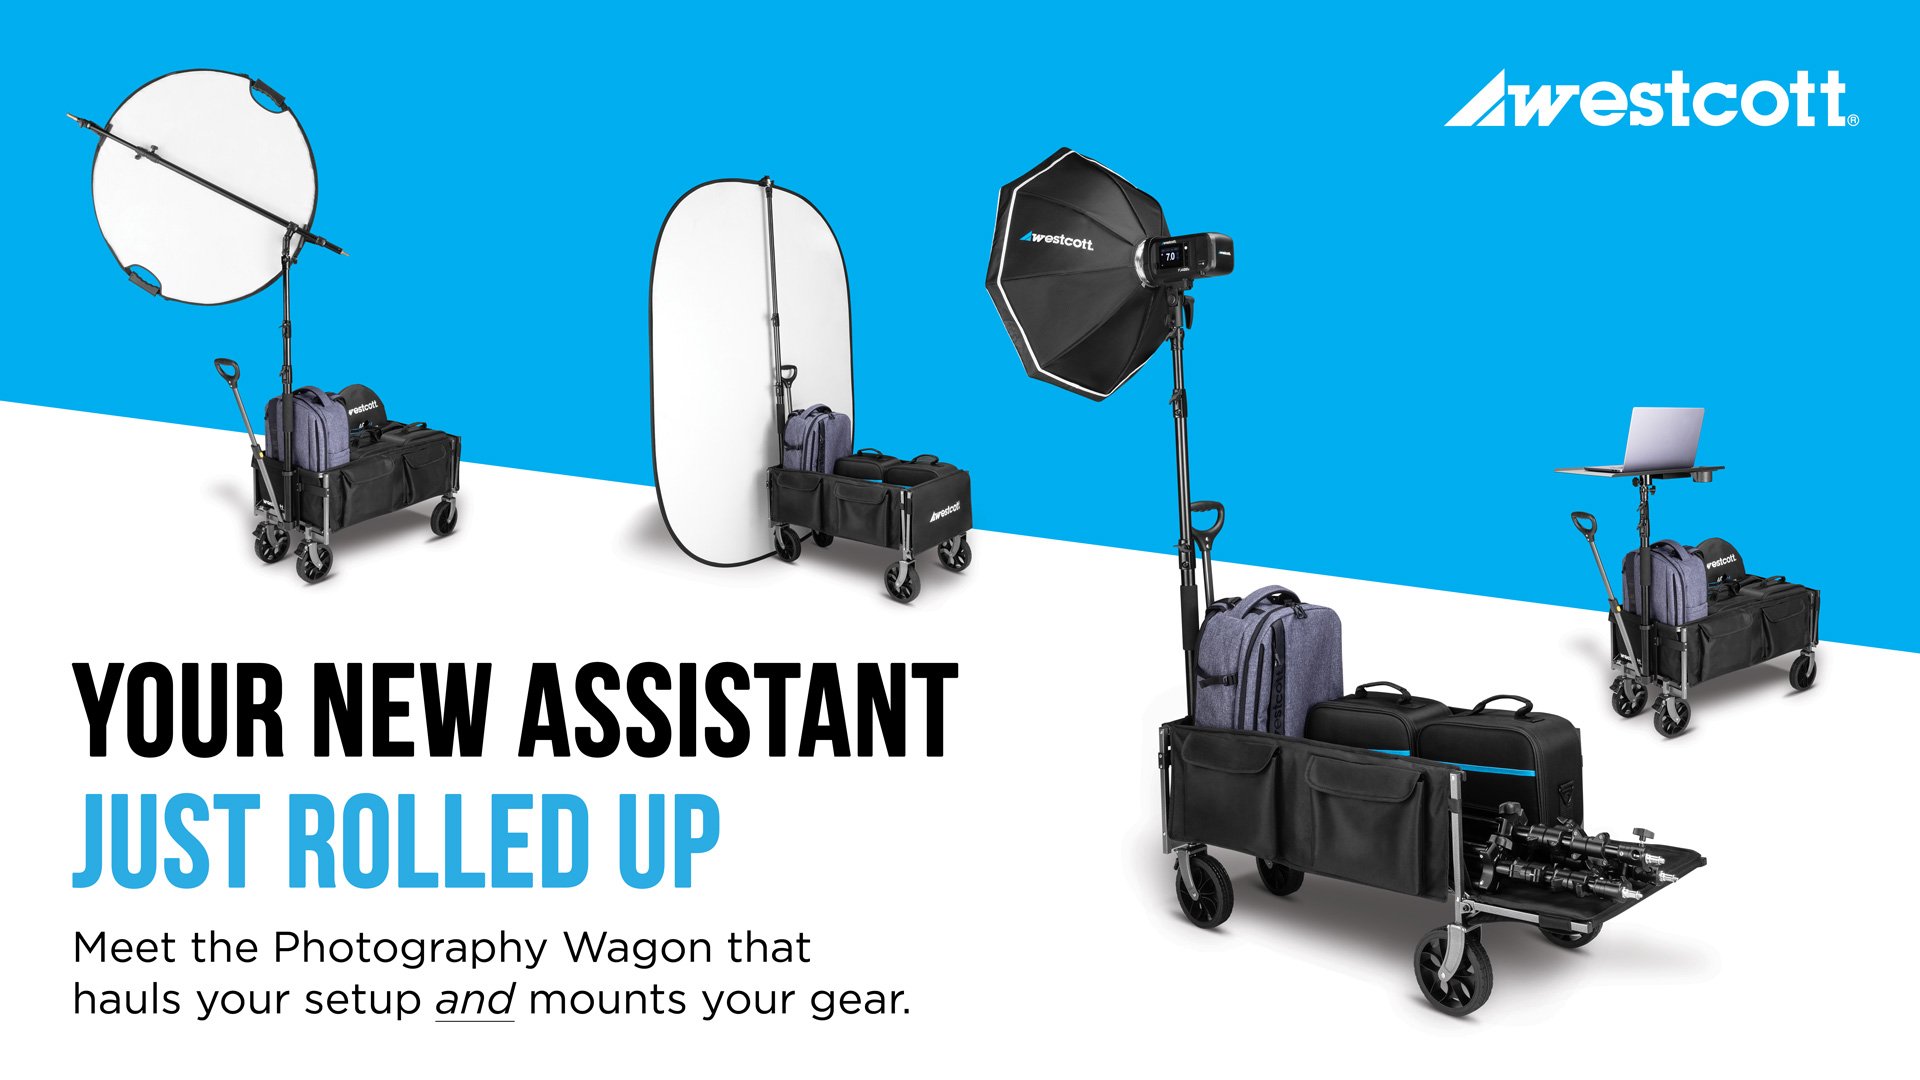
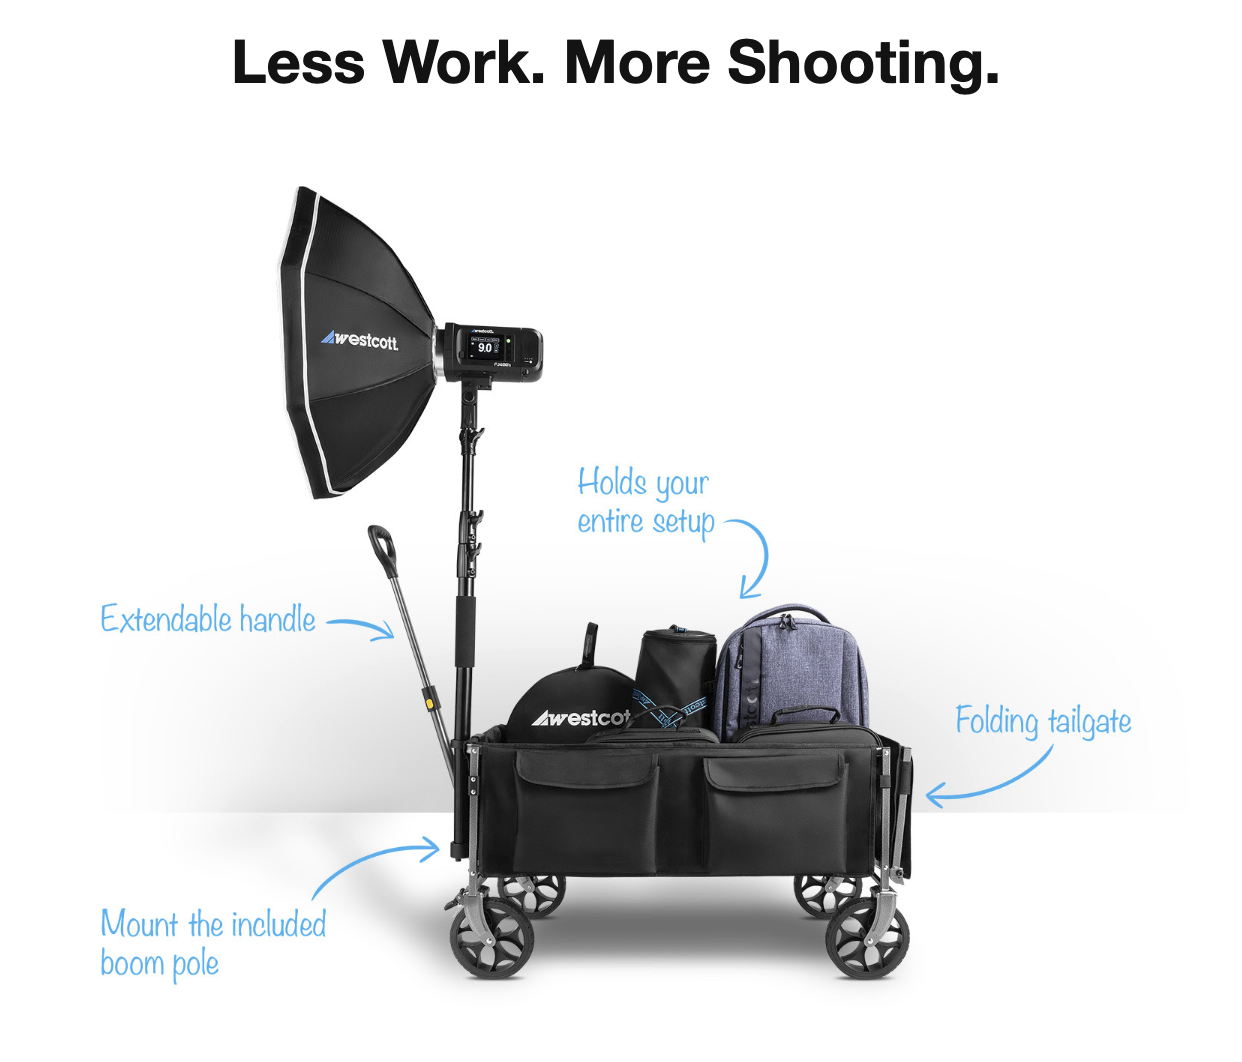
Plenty of people already use a wagon. I've seen no end of photographers turn up at conferences with a cart but what makes this one a photography wagon, rather than just a wagon, is the boom pole which also drops into a holster built into the frame and locks so it won't rotate.

It gets up to 7ft 8in, about 2.3 metres, and it'll take 13 pounds on the end of it, so roughly 6 kilos; easily an FJ400 and a decent sized softbox.

The pole comes out and works as a handheld boom too, and there's a soft grip section on it, which is useful if you're shooting somebody on steps and want the light coming down at them.

And it isn't only for lights; you could also attach a reflector for example or even a tethering table.

What it actually holds

175 pounds, which is about 79kg. The cart itself weighs 24 pounds, near enough 11kg.

The sides are fabric panels that fold over onto hook and loop tape and hide the frame, so the thing looks like a piece of professional kit rather than something off the beach. There's a fold down tailgate at the back for anything long, a C stand say, so it can sit out the end. Grab and go pockets on the sides, and the bottom has a thicker section of padding sewn into the middle of it, which is the sort of detail you only appreciate after you've put a heavy light down hard.

The front two wheels have friction brakes. They still swivel when they're locked, so it's the rolling that stops, not the steering.

Setting it up is a handful of movements: open the two sides, fold the fabric panels over, press the hook and loop down, drop the boom pole into the holster. Collapsing it is the same in reverse. That's it.

It doesn't care whose lights you own

Worth saying plainly, because it's a bit unusual for a Westcott product. There's nothing here that ties you to their lighting. Any brand's stands, any brand's bags, and any brand's light on the end of that boom.

So if you shoot Godox, or Profoto, or anything else entirely, it works exactly the same for you as it will for me.

Mine is en route

So this is a post about a product I've been shown by the folks at Westcott, rather than one I've rolled across a car park or a beach but it is en route, so when it turns up I'll do a proper video with it because for me, this is going to be incredibly useful when out photographing for my I am Lyme project, when on my own.